

How To Create User Mailbox In Exchange 2010
When a company has implemented Exchange hybrid and has moved some or all their users to Office 365, the question "How do I create a mailbox in Office 365?" frequently comes up.
In this article, we explore how to create a mailbox in Exchange Online when directory synchronization is in place. For this article, we will explore this process using Exchange 2016. We will look at how to complete this task with the GUI and PowerShell. Note that these steps are identical for Exchange 2013.
Using the Exchange Admin Center
This is the simplest and quickest way to create a mailbox in Office 365. The drawback of this solution is that it only allows you to create an entirely new Active Directory user. A preexisting user without a mailbox cannot be enabled for an Office 365 mailbox using the GUI. To grant an existing user an Office 365 mailbox you will need to use PowerShell. Alternatively, that user could be given an on-prem mailbox and then move that mailbox to Office 365.
If your current process is to create a new account in Active Directory first and then enable the mailbox in Exchange second, I would recommend reversing these steps. Using the method below allows you to create a basic user in Active Directory with a mailbox in Office 365. Then you can go back into Active Directory to make any additional changes to the new account, such as group memberships.
For our example, we are going to create a new user called Wilfred Mott who will have a mailbox in Office 365. Wilfred does not currently have a user account in Active Directory so we can use this method. Wilfred's email will be wilfred.mott@exchangeservergeek.com.
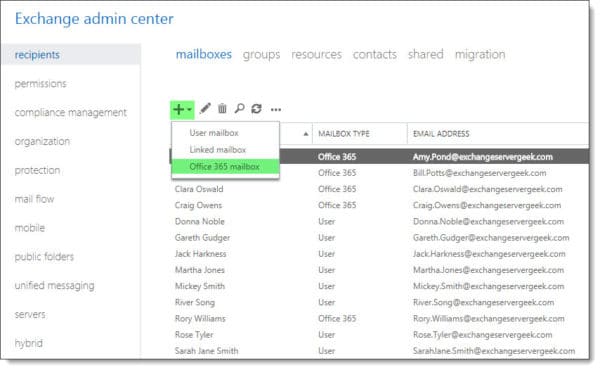
From your on-premises Exchange 2016 server, log into the Exchange Admin Center. Select the Recipients tab and Mailboxes sub-tab. Click theNew (plus sign) and selectOffice 365 mailbox.
Note: If you do not see this option you may be missing the required RBAC permissions, or, there is an issue with your hybrid configuration.
Selecting this option walks you through the process of creating a remote mailbox in Office 365. The benefit here is that you do not need to migrate the mailbox after it is created as it already exists as an object in the cloud. Keep in mind that you will not see this mailbox in the Office 365 tenant until directory synchronization has run.
On the New Office 365 Mailbox window type the First name and Last name of the user. As you complete these fields you will notice that the Name field populates combining these values. The name field corresponds to the display name field for the user object in Active Directory. You can alter this field to be a different value than what was suggested.

Click Browse in the Organizational Unit section. This brings up the Select an Organization Unit dialog. From here you can select which Organization Unit (OU) you want the new user account to be created under.
Under User logon name specify a new username for the user. From the drop-down to the right of the @ symbol pick the domain suffix for the user. This builds a User Principal Name (UPN) for the user. Note that the domain name you pick here must be a domain you have validated in Office 365.
Under Mailbox type,pick the type of mailbox you want to create in Office 365. In our example, we are creating a mailbox for user Wilfred Mott so we will pick User Mailbox. Room and Equipment mailboxes are also available if you want to create a resource mailbox in Office 365.
Specify and confirm a password in the New Password and Confirm Password fields. You can also check the box to Require password change on next logon to force the user to create a new password.
By selecting Create an archive mailbox we can also instruct Office 365 to create an archive mailbox for the user in the cloud.
Unlike on-premises mailbox creation, we do not get an option to pick a primary or archive database for our user. In Office 365 we cannot manage databases or servers. In turn, this negates our ability to choose how those users are assigned or distributed across databases. Microsoft makes this choice for us and it is not uncommon for Microsoft to redistribute mailboxes across databases.
If you are looking to create a user and mailbox quickly the minimum fields required are those marked with an asterisk.
For our example, we specified a first name, last name (which populated name field for us), Organizational Unit, username, domain suffix, mailbox type, and password.
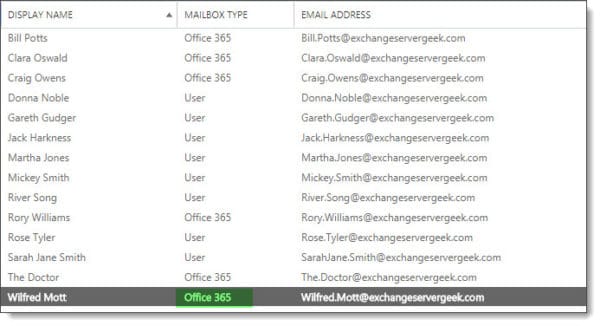
With your fields populated click the Save button. Your mail-enabled user will now appear under the Mailboxes tab. The Mailbox Type for Wilfred will be listed as Office 365. On-premises mailboxes are listed as type User. This is a great way to distinguish which mailboxes are on-prem and which are in the cloud.
Keep in mind the user will need to be assigned an Office 365 license before they can access their mailbox.
Note: Your user will not show in Office 365 until directory synchronization completes. How long this takes depends on how your sync cycle is configured. You can force an immediate sync with Azure AD Connect by running the following PowerShell command: Start-ADSyncSyncCycle -PolicyType Delta
Using the Exchange Management Shell
To perform this same task in EMS we use theNew-RemoteMailbox cmdlet. Using the above example of Wilfred Mott let's see what the process would have looked like in PowerShell.
From your on-premises Exchange 2016 server, open the Exchange Management Shell.
First, we will need to capture a temporary password for Wilfred in a variable. The password will be saved as a secure string. To do this enter the following command. Enter a password when prompted.
C:\> $password = Read-Host "Enter password" -AsSecureString Enter Password: *********
Next, let's create the mailbox and parse in the $password variable.
C:\> New-RemoteMailbox -Name "Wilfred Mott" -FirstName "Wilfred" -LastName "Mott" -OnPremisesOrganizationalUnit "skaro.local/Whoniverse" -UserPrincipalName "wilfred.mott@exchangeservergeek.com" -Password $password -ResetPasswordOnNextLogon:$true
In this cmdlet:
-Name specifies the content of the display name field in Active Directory.
-FirstName specifies the first name of the user.
-LastName specifies the last name of the user.
-OnPremisesOrganizationalUnit specifies where in the on-premises Active Directory the new user account should be created. The New-RemoteMailbox cmdlet tweaks the naming of the parameter from -OrganizationalUnit to -OnPremisesOrganizationUnit to emphasize where the user account exists. In our example, we specified this as the on-premises Whoniverse OU in the Skaro.local domain. This is an optional parameter. If you omit this parameter the user will be created in the default Users OU.
-UserPrincipalName specifies the username in UPN form.
-Password calls the variable named $password from our previous command.
-ResetPasswordOnNextLogon specifies whether a user must change their password the next time they log in.
Create an Office 365 Mailbox for an Existing User
To enable an existing user with an Office 365 mailbox we can use the Enable-RemoteMailbox cmdlet. For example, if we had already created Wilfred in Active Directory Users and Computers we can enable him for an Office 365 mailbox using the following command.
C:\> Enable-RemoteMailbox -Identity "Wilfred Mott" -RemoteRoutingAddress "wmott@exchangeservergeek.mail.onmicrosoft.com
In this command, the-RemoteRoutingAddress parameter specifies Wilfred's unique SMTP address in Office 365. The domain you use in the routing address is assigned by Microsoft to your Office 365 tenant. The routing address is stamped to Wilfred's TargetAddress property on his Active Directory account. This instructs our on-prem Exchange to route messages addressed to Wilfred to Office 365. We don't need to specify a primary SMTP address as this will be generated by our on-prem Email Address Policy (EAP).
Regardless of which command is used the user's mailbox will not show in Office 365 until directory synchronization performs a sync. Keep in mind the user will need to be assigned an Office 365 license before they can access their mailbox.
Further Reading
Here are some articles I thought you might like:
- Change the notification email for directory synchronization failures
- Access is Denied when enabling Group Writeback
- Easily Connect to Exchange Online with PowerShell
- Easily Connect to Office 365 with PowerShell

What is your preferred way of creating new users in Office 365? Do you create the user on-prem first and then migrate, or, use the method described above. Drop a comment below or join the conversation @SuperTekBoy.

How To Create User Mailbox In Exchange 2010
Source: https://supertekboy.com/2017/09/02/create-an-office-365-mailbox-in-hybrid/
Posted by: brownthisees.blogspot.com
0 Response to "How To Create User Mailbox In Exchange 2010"
Post a Comment